How to create high-converting product launch visuals with AI
Create on-brand hero images, mockups, and thumbnails for launches fast. Practical prompts, workflows, and GoCrazyAI steps to go from brief to publish-ready assets.
<!-- KEYTAKEAWAYS -->- Generate 5–10 variations, pick 2 winners, then upscale and retouch.- Use simple thumbnail layouts with 2–4 words and strong contrast for higher CTR.- Feed final frames into an AI video generator for animated hero clips.<!-- /KEYTAKEAWAYS --> You need high-quality launch visuals but you don't have a studio budget or days to wait. This guide shows exactly how to use AI image generation to produce hero images, mockups, and thumbnails that convert — fast. You'll get specific prompt examples, a tested 5–10 variation workflow, editing tips for phone and web hero shots, and how to move those frames into short animated promos. I also explain the fastest path to publish-ready assets using GoCrazyAI's AI Image Generator so you can prototype and ship the same day.
Quick Answer
How do you create high-converting product launch visuals with AI? Use a short, structured workflow: write a clear brief, generate 5–10 variations with an AI image generator, pick the top 2, upscale and lightly retouch them, and export platform-ready aspect ratios. For motion, feed the final frames into an AI video generator for short animated hero clips.
Why are AI-generated visuals now essential for product launches?
AI-generated visuals are now essential because they drastically reduce cost and time while producing marketer-ready assets. For zero- or low-budget launches, industry guides report AI can cut image production costs by roughly 80–90% compared with traditional photography[[1]](#source-1). That makes it realistic to test multiple visual directions, A/B thumbnail variants, and quick hero animations without a studio or long lead times.
Practical implications: you can iterate creative hypotheses (color, composition, messaging) in hours instead of weeks, and keep several platform-specific crops on hand. This usually works best when you have a tight brief and a small set of brand constraints (logo placement, brand color, product scale). For launch teams, the cost and speed advantages let you run rapid tests and shift paid creative toward the top-performing frames.
What design principles make launch images convert (data-backed)?
Simple layouts, clear focal points, and readable text are the core principles that tend to improve conversion and click-through. Studies and industry analyses show that thumbnails with simpler layouts and 2–4 words of text often outperform cluttered designs; average YouTube CTR is roughly 2–5%, while simpler thumbnails can push CTR higher in many analyses[[2]](#source-2).
Other measurable attributes that help: high-contrast composition, face prominence for people-driven launches, and clear product isolation for hardware or physical goods. Academic research finds that these visual attributes have statistically significant relationships with view-through and engagement, so these are not just design folklore — they are measurable levers[[3]](#source-3).
Actionable checklist:
- Use a single clear subject and remove background clutter.
- Limit on-image text to 2–4 words and a bold, readable font.
- Use contrast and complementary brand color overlays to separate subject from background.
- Favor tight crops for thumbnails and wider hero crops for landing pages.
Tip: For thumbnails, test one face-focused variation and one product-closeup; these two often target different audience triggers and help you learn fast.
From brief to first draft: generating concept images with GoCrazyAI AI Image Generator (step-by-step)?
The fastest path from brief to a usable first draft is: write a precise brief, pick the model and aspect ratio, generate 5–10 variations, then save and iterate on favorites. GoCrazyAI's AI Image Generator is designed for this workflow: it accepts a text prompt, edits uploaded photos with a prompt, and outputs social-ready aspect ratios so you can generate thumbnails, hero images, or mockups quickly.
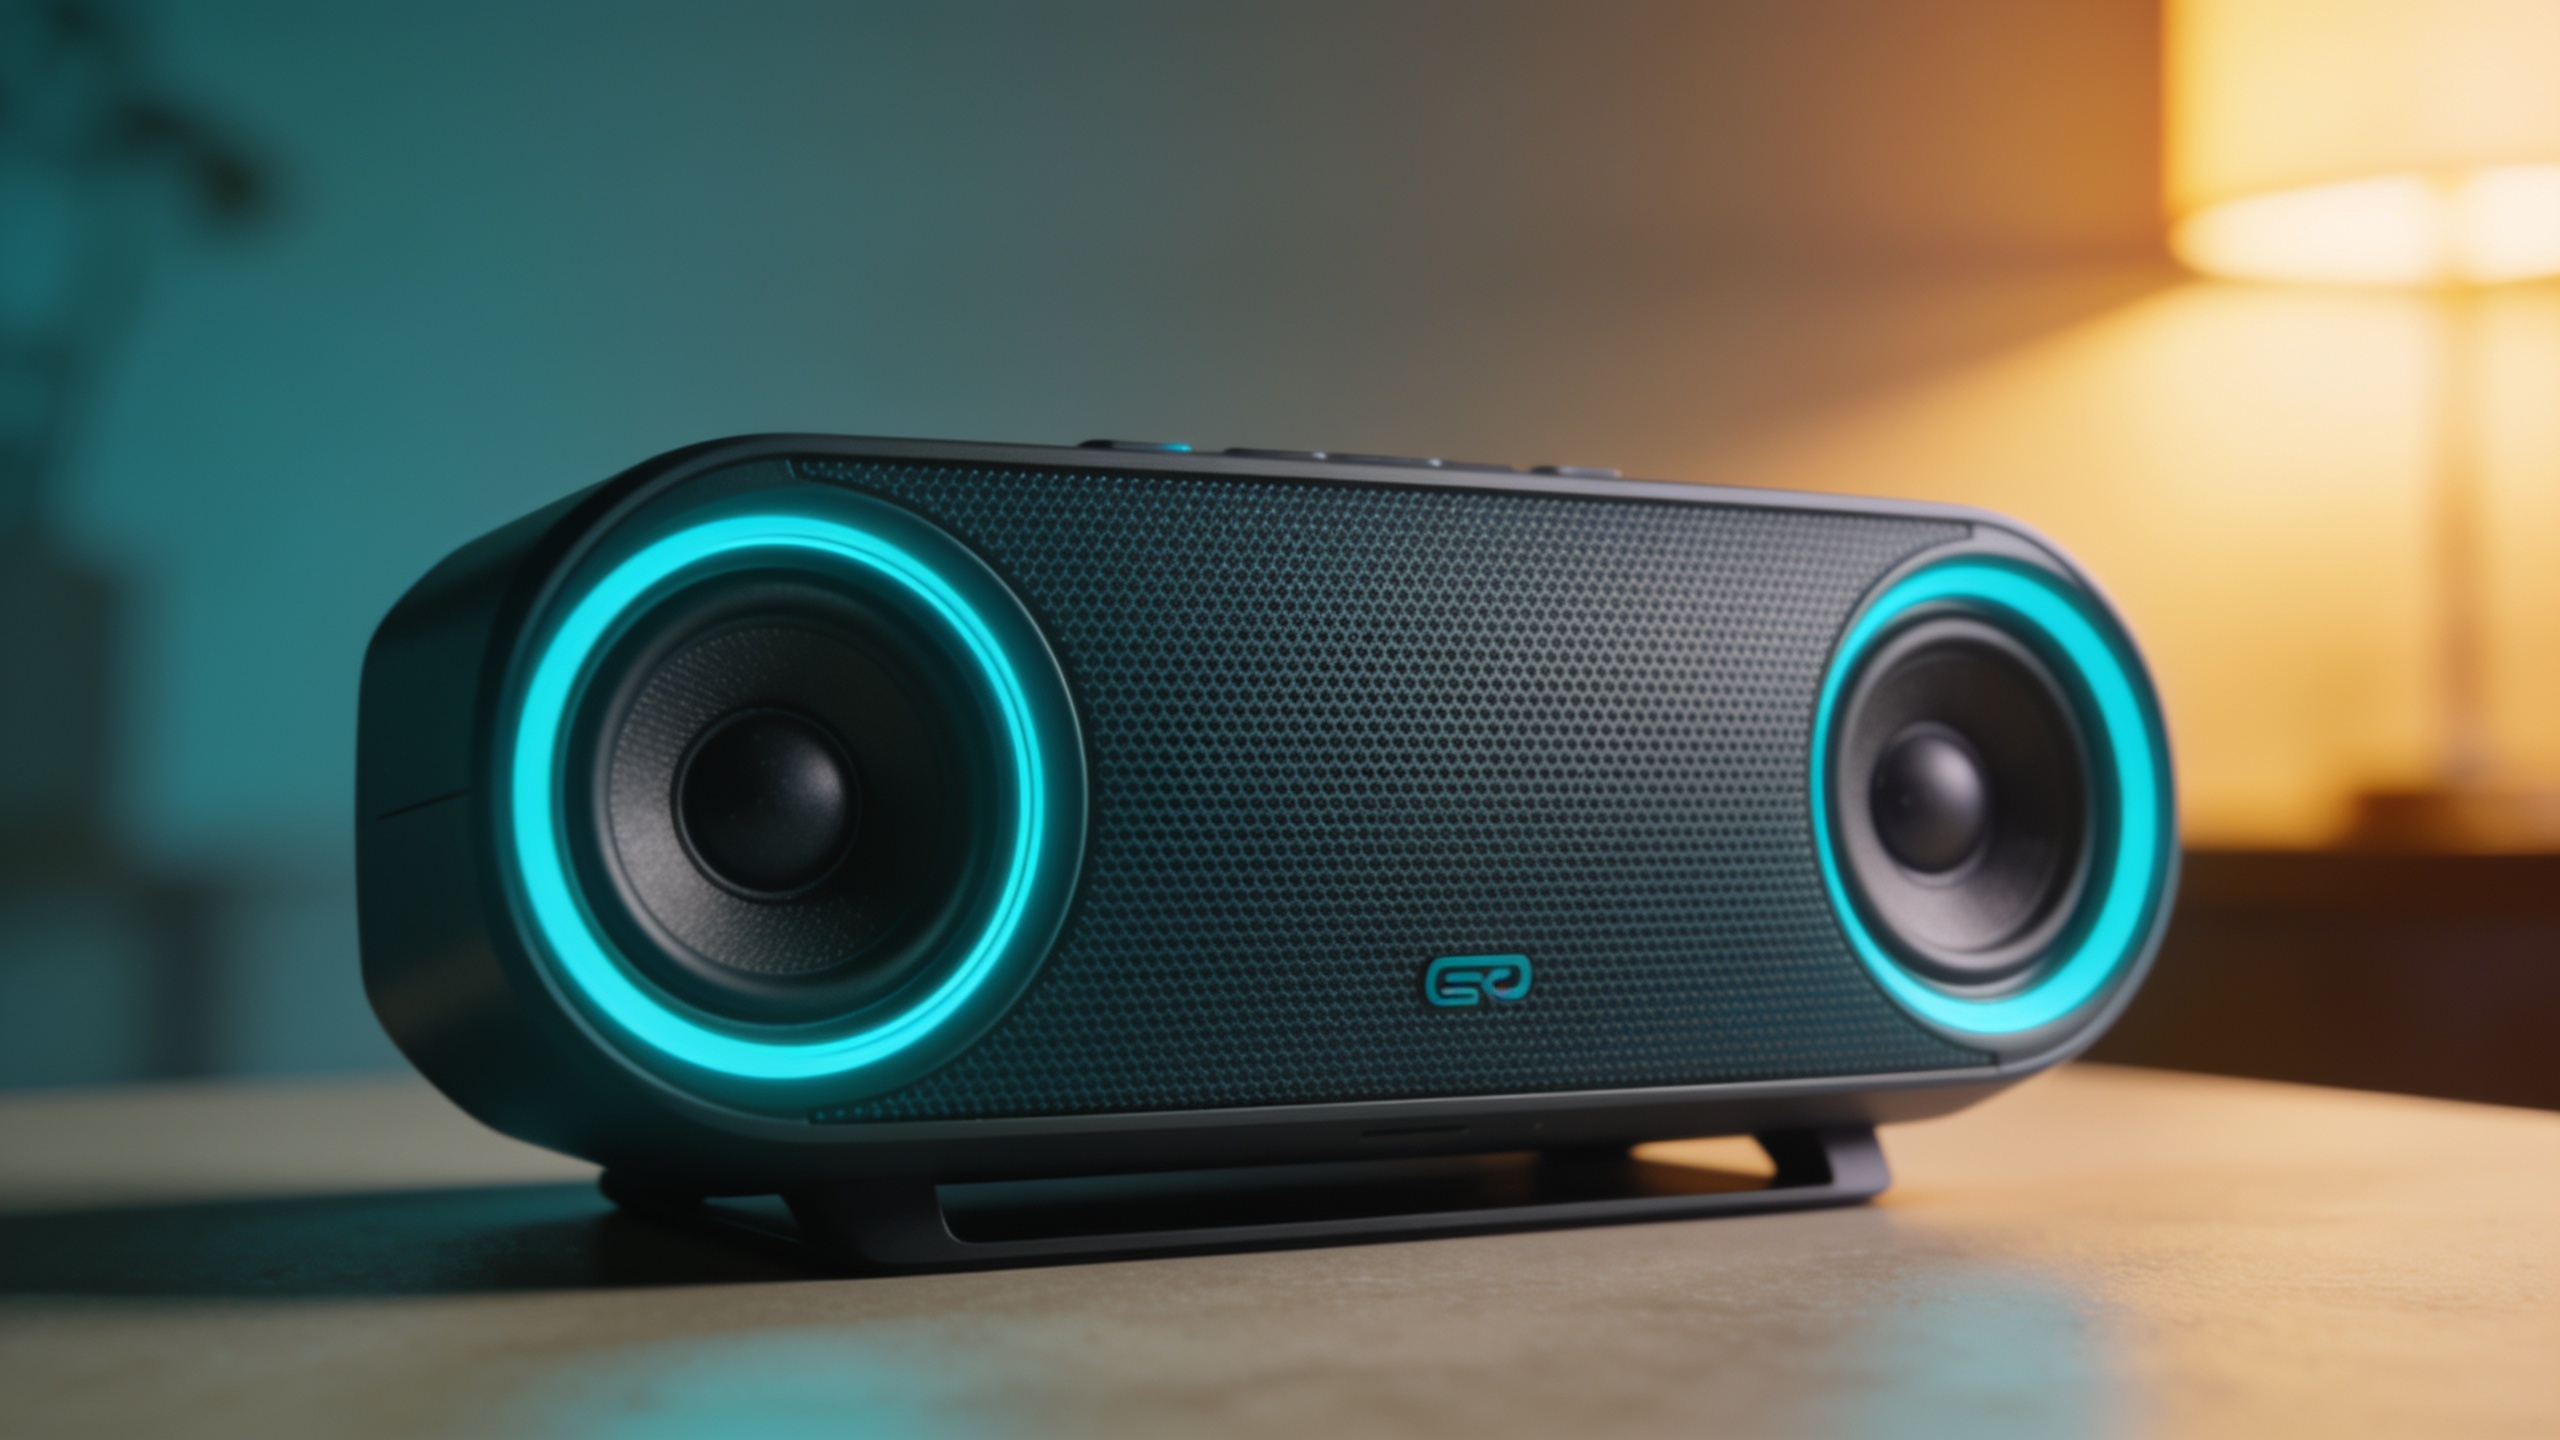
Step-by-step process on GoCrazyAI: 1) Create a one-paragraph brief: include product type, desired mood, color palette, and shot type (close-up, hero, lifestyle). Example: "Sleek wireless earbud product hero, minimal white studio background, hand holding case, warm key light, brand accent cyan, 3:2 landscape, high contrast." 2) Choose the model (Seedream 4 for photoreal, Google Nano Banana for stylized, Kaneko Gen Pro for clean product render). 3) Select the aspect ratio(s) you need (16:9 for YouTube, 4:5 for Instagram feed, 1:1 for ads). 4) Generate 5–10 variations and save each to your library. 5) Pick top 2, then use the edit/restyle tool or re-run with tighter instructions to refine pose, lighting, or background.
Example prompt samples you can copy: ``` "Hero shot, compact smart speaker on wood table, warm morning light, shallow depth of field, brand color orange accent, 16:9, photoreal, minimalist composition" ```
``` "Closeup product mockup: matte black fitness tracker on wrist, high contrast rim light, simple grey background, 1:1, ultra-detailed" ```
These prompts work best when you start with a clear product description and add one or two stylistic modifiers. Save variations so you can compare crops and tones quickly.
You can try every step above directly in GoCrazyAI AI Image Generator — no setup needed.
How do you turn concept images into mockups and hero shots (what example workflows and editing tips work best)?
Yes — a repeatable workflow turns broad concept outputs into polished mockups and landing hero images. The common recommendation across design playbooks is to generate 5–10 variations, pick the top 2, upscale them, and perform light retouching: mask the product, adjust color/contrast, and add a brand-color overlay for consistency[[4]](#source-4). This practical path usually delivers publish-ready hero shots with minimal studio work.
Concrete workflow (example):
- Step 1: Generate variations focusing on composition (centered, left-aligned, lifestyle).
- Step 2: Pick two winners — one for hero, one for detail shot.
- Step 3: Upscale the chosen images to the final resolution using an upscaler to preserve crisp edges. GoCrazyAI's Image Upscaler is an option for 4K/8K needs.
- Step 4: Mask the product in a photo editor; tweak exposure and contrast.
- Step 5: Apply a subtle brand color overlay or vignette to guide attention and ensure consistent feel across pages and ads.
Editing tips:
- Keep retouching light: avoid heavy compositing that changes product proportions.
- Maintain consistent light direction across hero + detail shots.
- Export multiple crops for landing page hero, social cards, and ad slots so you don't lose quality when platform-specific crops are needed.
Tip: Save layered PSDs or editable files so you can quickly swap backgrounds or swap text for seasonal campaigns.
How do you craft click-ready YouTube and podcast thumbnails using AI (A/B test-ready variations)?
To craft thumbnails that are test-ready, create at least two distinct visual hypotheses: a simple product-closeup and a human-leaning, emotional variant. Use 2–4 words max on the image, high contrast, and large readable type; these practices correlate with improved CTR in several analyses[[2]](#source-2). Academic work also supports using composition and face prominence as measurable drivers of engagement[[3]](#source-3).
Practical A/B test setup:
- Variant A: Product close-up, bold 2-word text, high contrast, light background.
- Variant B: Person using product, face visible, 2–3 word emotional headline, darker background with brand accent overlay.
- Generate 5 variations of each variant in your image generator, then pick the top 2 per variant to upload as creatives for an A/B run.
Prompt example for a thumbnail: ``` "YouTube thumbnail: high-contrast close-up of portable charger, bold two-word headline area left, white background, brand blue accent, 16:9, large negative space" ```
Metrics and expectations: expect baseline CTRs around 2–5%; simple, well-composed thumbnails can push toward higher CTRs depending on audience and title alignment[[2]](#source-2). Run a short paid or organic experiment for 48–72 hours to collect statistically useful differences before committing large budgets.
How do you scale and keep brand consistency using model presets, seeds, and versioning in GoCrazyAI?
You can scale while keeping brand consistency by locking in a small set of model presets, seed values, and saved variants. GoCrazyAI supports saving variations to your library and reusing model choices (e.g., Seedream 4 for photoreal product shots) which makes reproducing the same look across multiple images faster. Save a prompt template with explicit brand color values, light direction, and scale instructions so teammates can reproduce the look.
Scaling checklist:
- Create 2–3 model presets: e.g., "Hero photoreal (Seedream 4)", "Lifestyle warm (Nano Banana)", "Clean render (Kaneko Gen Pro)".
- Use seed values when you want reproducible variations across different crops and scenes.
- Version assets by saving iterations into folders in your GoCrazyAI library so you can roll back to a favorite variant.
- Standardize export sizes and naming: add size and purpose in filenames (e.g., product-hero16x9v2.png).
This approach lets teams produce dozens of consistent assets quickly and ensures designers or marketers can pick an approved preset and get predictable results. For short animated promos, export the chosen frames and feed them into the AI Video Generator to add motion without reshooting.
What final polish, export settings, and common mistakes should you avoid when feeding images into GoCrazyAI’s AI Video Generator?
Final polish and export settings matter because the video generator takes your frames as reference; low-res or heavily compressed images often produce poor motion continuity. Export final hero frames at the highest practical resolution (use an upscaler for 4K if needed), keep backgrounds simple for easier animation, and ensure consistent lighting across frames.
Recommended export settings:
- Use PNG or high-quality JPEG at 2–4x target resolution.
- For short hero clips, export 1920x1080 or 4K frames depending on final channel. Upscale if source was smaller.
- Keep aspect ratio consistent with your video output (16:9 for YouTube hero clips).
Common mistakes and how to avoid them:
- Mistake: Generating only 1–2 images and treating them as final. Avoid by creating 5–10 variations and choosing the best two[[5]](#source-5).
- Mistake: Heavy compositing that changes product geometry. Avoid by keeping edits that alter proportions minimal.
- Mistake: Uploading low-res or mismatched aspect ratios into the video generator. Avoid by exporting at the target resolution and aspect ratio or using an upscaler.
Once polished, you can feed frames directly into GoCrazyAI's AI Video Generator to create short animated hero clips or motion for social — this multimodal workflow often outperforms static images on social channels[[6]](#source-6).
Frequently Asked Questions
How many variations should I generate before choosing a hero image?
Generate 5–10 variations, pick the top 2, then upscale and lightly retouch the winners. This is the common recommendation in design playbooks and helps you A/B test quickly[[5]](#source-5).
Will AI images look stock or generic for my product?
Not if you use clear briefs, brand color constraints, and model presets. Locking mood, lighting, and scale in prompts produces consistent, on-brand assets you can refine with light edits.
Can I use the same image for a hero shot and a thumbnail?
You can, but it's better to create platform-specific crops and possibly a tighter thumbnail variant. Export multiple aspect ratios to optimize composition for each placement.
Do AI-generated thumbnails actually improve CTR?
Design choices like simplicity, text length (2–4 words), and contrast have been shown to correlate with higher CTRs; well-composed thumbnails often beat cluttered ones in tests[[2]](#source-2)[[3]](#source-3).
How do I move from an image to a short animated hero clip?
Export your polished frame at high resolution and feed it into an AI video generator as a reference frame. Keep lighting and background simple; short motion or parallax effects usually work best.
Conclusion
Final thoughts: For product launches, AI image generation makes it realistic to iterate and test creative directions quickly. Use a tight brief, generate many variations, pick and polish the best two, and export platform-ready crops. If you want a fast path from concept to publish-ready images and frames you can animate, try the AI Image Generator to spin up your first frame and iterate from there.
Sources
- Which AI Image Tools Work Best for Product Mockups - Startupikstartupik.com ↗
- How Simplicity Impacts Thumbnail Click-Through Rates - ThumbnailCreatorthumbnailcreator.com ↗
- I've created thousands of AI images and these are the best AI image generators of 2026 - Tom's Guidetomsguide.com ↗
- An exploration of the relation between the visual attributes of thumbnails and the view-through of videos - ScienceDirectsciencedirect.com ↗
- Midjourney for Ecommerce Product Mockups - Rewarx (guide)rewarx.com ↗
- AI Mockup Generator Guide: Create Professional Mockups Fast - Sleek.designsleek.design ↗
- Tech Product Graphics Design Playbook - DesignLumodesignlumo.com ↗
- Using AI for Product Mockups and UI Concepts - MintedBrain Tutorialsmintedbrain.com ↗
- AI Workflow: Launch a Product with Zero Budget - ZSky AIzsky.ai ↗
- ChatGPT users have generated over 700M images since last week, OpenAI says - TechCrunchtechcrunch.com ↗